Friday, December 6, 2013

{DIY} Cheap and Easy Nativity Candles


We made these super easy nativity candles in our classroom this week. The total cost was less than $1.00 per candle. I recycled mason jars that I already had. Each candle used half a sheet of vellum (25 cents) and one battery operated candle (about 50 cents each). We used scrap ribbon to embellish each one (free!). The project took us about 35 to 40 minutes to complete.


They would make a great project for a classroom party or cub scout den meeting. Or just make a few for your mantel with your own little ones.

Print out the free patterns below on a piece of vellum. I gave my students a choice between two different nativity scenes.


Color the vellum with some colored pencils.

Attach the vellum to the outside of a mason jar. Embellish with ribbon. Then insert a battery-operated or real tea light inside.


These photos didn't really show how pretty the nativity looked. It almost had the appearance of stained glass.

Nativity Candle Patterns


Pin It

Wednesday, December 4, 2013

The Reason Behind Christmas

If you haven't seen this Mormon Message before, you are going to love it. It took my breath away. I had to show it to my children and my students at school.


Here are the gifts I hope to give this holiday season.
This Christmas I am going to slow down.
This Christmas I am going to savor the tastes, smells and sights of the season.
This Christmas I am going to express my thanks more.
This Christmas I am going to look, really look, at my kids.
This Christmas I am going to smile and greet strangers at the store.
This Christmas I am going to compliment others more frequently.
This Christmas I am going to pray more fervently.
This Christmas I am going to sing more joyfully.
This Christmas I am going to give more hugs.


And here is another favorite in our family. We love the Piano Guys!


Pin It

Tuesday, December 3, 2013

Past Christmas Posts

Here are our favorite Christmas posts from the past. If you haven't seen them before, we think you will love them! And if you have, we think they are worth looking at again.


Santa's Pack


Christmas Mosaics


Baby Sock Nativity


Santa Countdown Calendar


Favorite Christmas Books


Pin It

Saturday, November 30, 2013

Christmas Shopping

By Deborah Rowley

I hope everyone had a great Thanksgiving with their families. Now the frenzy of holiday shopping has begun. I was visiting with one of my sister-in-laws on Black Friday and she told me about her family rule. She tells her kids that they will be getting four gifts for Christmas-- one in each of these areas:


Something You Want

Something You Need


Something To Wear

Something to Read


They can write down several suggestions in each area and then "Santa" will choose which gift in each area to give.

I loved this idea! It helps kids learn to distinguish wants vs. needs. It encourages literacy. It prevents kids from running around butt naked! Just kidding. I love that it sets limits and curbs materialism. You may want to try something like this in your family.

Pin It

Wednesday, November 27, 2013

Gratitude Games to Play With Kids-- Help your child be more thankful today!

By Deborah Rowley

The QR Code Activity that I posted yesterday is a fun way to get your kids thinking about what they are grateful for. See that post here. Here are some other fun gratitude games that you can play to help your child be more thankful. You can play these games on Thanksgiving or any other time of year.

*Note: These ideas came from my book: Before They Turn Twelve.

 Alphabet Gratitude

Write the 26 letters of the alphabet onto a sheet of paper and cut them out. Place all the letters in a bowl, and have a family member draw out a letter. Give the family members one minute to write down-- individually or in teams-- all the things they are grateful for that begin with that letter. Award one point for each item listed. Choose another letter and play again. Draw as many letters out of the bowl as you want. To increase the challenge, award a point only for the blessings that no one else in the family has written down.

The Thanking Chair

Designate one chair at the dinner table as the Thanking Chair. Whoever is sitting in that chair tells five things that he or she is grateful for. Take turns sitting in the Thanking Chair. For added fun, use a silly hat as the Thanking Cap, and place it on the person who shares his or her five grateful things for the night.

Count Your Blessings Candy


Serve a variety of small candies and call them "Count Your Blessings" candy. Family members must name a blessing for each piece of candy they eat.

A Pebble in the Shoe

Give each family member a small pebble to put in one of their shoes and a piece of candy to eat. Have them walk around the living room, eating the candy and feeling the pebble. Ask them which experience they noticed more. Would the candy have been more enjoyable to eat without the pebble as a distraction? Explain that when we are ungrateful and complain, it is like we have a pebble in our shoe. We don't fully experience the sweet blessings that God has given us, and we don't notice them as easily.

Pin It

Tuesday, November 26, 2013

Thanksgiving Gratitude Challenge with QR Codes

By Deborah Rowley

Here is a fun QR Code Activity your kids can do while you are cooking in the kitchen. Simply print out the QR codes here.

Cut them apart and place them around the house. Depending on your children's ages, you can make the codes easy or hard to find. Hint: If you want the activity to take awhile.... hide the codes really well!

Then give your child your smart phone or iPad with a QR Code Reader. I like Qrafter Pro but you can use any free QR code readers out there.

They will scan each QR Code that they find and then accomplish the challenge that they are given. Each QR Code asks them to take a picture of something that they are grateful for. Here are the QR Code Challenges:


#1 Take a picture of something in nature that you are grateful for.


#2 Take a picture of something in the house that you are grateful for.


#3 Take a picture of someone younger than you that you are grateful for.


#4 Take a picture of someone older than you that you are grateful for.


#5 Take a picture of a food that is going to go on the Thanksgiving table that you are thankful for.

#6Take a picture of an animal or pet that you are grateful for.


#7 Take a picture of a toy that you are grateful for.


#8 Take a picture of something that you take for granted that you are grateful for.


#9 Take a picture of something unusual that you are grateful for.


#10 Take a picture of something God gave you that you are grateful for.

When your child comes back with his or her 10 pictures you will be able to talk about all the things that he or she is grateful for. This will lead to such a fun conversation. Maybe you can sneak him a taste of something yummy that you are cooking as a reward!

If you have more than one child doing this activity, perhaps one child can scan and the other can take the picture or they could take turns with one child doing all the odd numbers and one child doing all the even numbers. Better yet, steal all the smart phones from all the grown ups in the house and send all the kids out to accomplish this challenge!

Thanksgiving Gratitude Challenge QR Codes

Pin It

Saturday, November 23, 2013

Weekend Inspiration and Laughs

Here are a few Thanksgiving videos to inspire you and a hilarious set of gifs that made us all laugh this weekend.


Giving Thanks is More Than a Holiday. It is how Happy People Live.


The Science of Happiness: An Experiment in Gratitude


My oldest daughter is a senior in college. She sent us this set of gifs this weekend. Whether or not you have any kids in college, you have to see this. It will really make you smile.

The Difference Between A Freshman and A Senior

Stay tuned for a Thanksgiving QR Code Activity to keep the kids busy while you cook!

Pin It

Thursday, November 21, 2013

{DIY} Cheap and Easy Lighthouse

By Deborah Rowley

We have been studying so much about ship voyages lately (Leif Erickson-Columbus-the Pilgrims) that I thought it would be appropriate to make some lighthouses. I had seen terra cotta planter lighthouses before and I loved them but I knew they would be too cost prohibitive to do at school. 
Instead I found this fantastic tutorial for cheap and easy lighthouses at Danielle's place. 


These were perfect! I think I spent a total of 50 cents per lighthouse. They would make a great project for Cub Scouts or Activity Day girls. They would also be fun to make on a rainy or snowy day just for fun!

I think they would look fantastic as a centerpiece on a holiday table. I don't have photographs of all the steps. But Danielle walks you through everything and she has a fantastic pattern for the windows, ladders and railing. She also has an elaborate roof pattern. We elected not to use that pattern for our lighthouses. The kids wanted to go without roofs. 


I did make a roof for mine by cutting a piece of red paper in a circle and then cutting a slit so that I could fold it into a cone.


Here is a list of all the supplies you will need for each lighthouse: 
Three 20 oz. foam cups
1 clear plastic cup (We used 16 oz. plastic cups) 
1 Sheet of Black Fun Foam for the Base
1 Battery-Operated Tea Light
1 Sheet of Card Stock Paper to Print out the Windows etc. 
Glue
Red Paper for Roof if Desired
We used black Electrical Tape for our stripes. I think Red Washi Tape would be gorgeous for a red stripped lighthouse! I just didn't have any on hand. 
(Note:  I couldn't find a plastic cup that would fit nicely on top like Danielle's so we just cut our plastic cups to fit)


Wouldn't this make a darling nightlight in a nautical themed room! All you need to do is lift the lid and turn on the candle each night. 

Pin It

Tuesday, November 19, 2013

Cardboard Weaving

By Deborah Rowley


We have been learning about the pilgrims at school. I decided my students needed to try some old fashioned weaving. I found this terrific tutorial by Joel. 


Then I Just cut up some squares of cardboard and introduced the idea to the kids. I was amazed at their reaction. They loved it! Even the boys! It kept them occupied over several class periods. I think it would be a fun project to try over the Thanksgiving break and it would keep the kids busy while Mom is in the kitchen. Here is a brief overview of the steps but I would really recommend checking out Joel's tutorial because he is much more thorough. 
Cut the cardboard your desired size. We started small. Our cardboard was only 3x 4 inches. Cut notches on two opposite sides. You need an odd number of notches. We did ours 1 cm apart. 
Start your yarn by sticking it through a notch and taping it to the back. 

Then continue to pull work the yarn down one side and around the notch on the other side. Above is what your cardboard should look like on the back. Below is what it will look like from the front.
Then you can start weaving your contrasting yarn in and out across the cardboard. You can tape the end or use a plastic yarn needle. Some of my students liked using a needle and others didn't. 

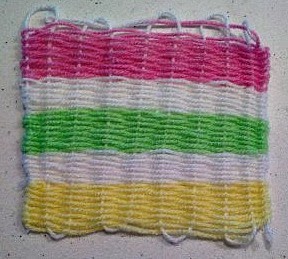
Here is an example of a project my daughter is working on. You can see how the weaving starts to come together. If you run out of yarn simply tie on another length. You can change colors at that point or keep using the same color. 
Here is the weaving up close!
I don't have any pictures of removing the yarn from the cardboard loom but Joel explains it well. You simple bend in your cardboard tabs and the knitting slides off. You can then tighten up the ends and tie it off. 
Here is another student's completed project. I think it would make a darling rug for a doll house or a great coaster for those mugs of hot cocoa. If you make them a little bit bigger, they also make great potholders. 
Have fun!

Pin It
Blogging tips