Friday, June 29, 2012

Parenting Tips: Character Journal

By Deborah Pace Rowley


I love the movie Little Men based on the book by Louisa May Alcott. My favorite character is Jo. She is the tomboy character from Little Women who is now all grown up and married to Professor Bhaer…not Laurie. (I know, I was devastated too! But that is a discussion for another time.) She and her husband run the Plumfield School for Poor Boys. She keeps a character journal for each of these young men and writes in it weekly. The journal is called a character journal because she writes about the character traits that she is seeing them develop. She records the times that they show great character and the positive traits that she sees in them. She also records the times that they acted without character and her disappointment in their behavior. I thought this idea was so powerful that I adopted it for our own family. I cannot say that I have written weekly but I do try to add an entry every so often for each child. I try to focus my short entries on the character traits that I am seeing develop in them.

I know lots of mothers write yearly letters to their children or keep a diary to record their children’s progress. They plan to give this special record to their child on their wedding day or at graduation or on some other momentous occasion. The thing that was different about Jo’s character journals was that she gave them to the boys each week to read. She wanted the journal to be a motivation to grow and improve for the future and not just a record of the past.

When I write in one child’s journal, I place it on his or her bed to read before I collect it again. I never say anything about the journal and most of the time my children don’t comment on what I have written but I have seen the quiet impact certain entries have had on their behavior. My oldest daughter has now left for college and I sent her completed journal with her to Virginia. She has told me several times that the words that I had written throughout her life strengthened her and helped her to believe in herself when she was feeling discouraged and overwhelmed and a little small. What more could I want for my Little Women and Little Man. 
Pin It

Thursday, June 28, 2012

Elementary Activities: Make Your Own Word Games

By Tiffany Rudd

Recently I had a few days where I was sick and stuck in bed. My cute niece, Katie, came over with the sweetest homemade gift. It was a collection of puzzles she had created online and printed just for me. There were word searches, crossword puzzles, mazes, sudoku...you name it! What a sweet gift and a great activity for older children.
There are all kinds of great websites for creating puzzles online. One of my favorites is the FREE PUZZLEMAKER from Discovery Education. Just on this one site your child can create word searches, crossword puzzles, double puzzles, fallen phrases, math squares, mazes, letter tiles, cryptograms, number blocks, and hidden messages!

I also found THIS website where you can print sudoku puzzles and even learn how to create your own.

This would be a great activity for a rainy afternoon, or for a vacation or road trip!


Pin It

Wednesday, June 27, 2012

Writer's Workshop Movie

This is the awesome video that the kids in our Writer's Workshop produced this morning. Just had to share.

Pin It

Preschool Activities: Seed Soar

By Deborah Pace Rowley

Recently we have been inundated with cotton from the cottonwood trees that dot our yard. I love to watch the cotton float lazily through the air like some incongruous snow storm on a summer day. Watching things (and making things) fall to the ground is fascinating stuff for preschoolers and it makes a great science lesson too!
On a summer day when there is a light breeze, take your preschooler to the park or backyard. Talk about how plants spread and multiply when their seeds are carried by the wind. To illustrate this, see if you can find a dandelion with its white head and let your child blow the spores to places unknown in an effort to spread and conquer the planet through their weedy destruction! (Don’t do this while your lawn-obsessed neighbor is watching!) Explain that every spore that lands then has the potential to become another dandelion if it gets the proper sunlight, rain, and dirt to grow. Seeds don’t always travel by the wind. You can also discuss other methods of transportation. Birds can carry seeds to other places. We can pick up seeds or burs or other plant life on our shoes and carry it to distant places where it can grow.  

After your brief lesson, see how many types of seeds or leafs or pods you can find. Then climb onto the top of the playground equipment and send your collection of seeds soaring to the earth one at a time. How does each seed float? How fast do they fall? Which seed traveled farthest from the place that it started? Make predictions and test your predictions together. Just think, you may have helped a baby weed get its start in the world.

Pin It

Tuesday, June 26, 2012

Toddler Activities: Foot Parade

By Deborah Pace Rowley

As a young mother I worked at Parent Cooperative Preschool in Salt Lake City. One tradition at this popular preschool was a favorite of the two-year-old class. It was the annual Foot Parade. You can have your own foot parade at home or with a playgroup of friends. This activity works best outside for reasons that will soon be made clear. It is perfect for a long summer afternoon. All you need are some shallow containers (disposable cake pans work great) and a variety of items your toddler can walk on or step in. 

Line up your items in a row and let the foot parade begin. Mom or Dad should help their child step in each container and cross each surface in the parade. Ask your child which surfaces she likes to feel on her feet and which ones she doesn’t. Be sure to have a camera handy to capture all the funny facial expressions. 

Here are some ideas to get you started in creating your own foot parade. Think up some of your own.

Textured Surfaces:
Grass
Cement
Plush Carpet Square
Silk Throw Pillow or Silk Scarf
Quilt Batting
Fuzzy Scarf or Sweater
Square of Artificial Turf or Rough Door Mat
Piece of Plywood (Step carefully to avoid splinters)
Cool Marble Cutting Board
Big Bubble Wrap

Items in shallow containers:
Feathers
Wood Chips
Cotton Balls
Jello
Warm water
Sand or Salt
Potting Soil
Paint
The tray of paint was always the last item in the foot parade. The children would step from the tray of paint onto a roll of paper and then march down the paper, leaving a set of darling footprints as a priceless memento of the day. Be sure to add the date and age of your child. 
Pin It

Monday, June 25, 2012

Meal-Time Activities: Conversation Placemat

By Tiffany Rudd


Now that school is out, it's nice having Cameron home all day, and not getting all the kids in and out of the car twice a day definitely saves us time. But to be honest, I miss the drive home after school. That ride home was definitely one of our best conversation times of the day. All I had to ask were two questions, "What was your favorite part of today?" and "What was your least favorite part of today?" Just these simple questions got him and his little sister talking the whole way home. 


So, I made this conversation placemat so they can answer these questions around the dinner table each night instead. And, as an added bonus, that means Dad gets to hear all the daily details too. 


Print your own Conversation Placemats HERE. It's best to laminate them if you'd like them to last. Then just go around the table giving each family member a chance to answer the questions. Hopefully you'll enjoy some great conversations like we have. 
Pin It

Friday, June 22, 2012

Bonus Activity: DIY Giant Bubble Blower {Bubble Week}

By Deborah Pace Rowley & Tiffany Rudd

I hope you've enjoyed all the fun bubble activities this week! We really tried, but couldn't come up with a decent Parenting Tip post even remotely related to bubbles.

So, lucky you...you get a bonus activity post this week! And, this one was an absolute hit at our open house last week.
Giant bubbles! And I mean seriously giant bubbles. And with very few supplies and a few minutes work you can make some too.
Giant bubbles originally happend at our house thanks to this kit grandma bought for the kids. It isn't super spendy, but it is also incredibly easy to make one for yourself for $1 or so.

 Supplies Needed:
  • Dowel rod. It doesn't have to be very thick and 3 feet or so should be plenty long.
  • Two pieces of yarn. Cut one to 18 inches and the other to 60 inches (5 feet).
  • Two rubber bands. We used one thick and one thin, but whatever you have should work fine. 

How To Make a Giant Bubble Blower:

1. Tie one end of your long string and one end of your short string to the end of the dowel rod. So, both strings are tied to the the dowel rod in the same place. Wow, this is much harder to explain than it is to do. :)
2. Put the free end of the long string through a rubber band. We used the bigger rubber band here. The string should NOT be tied to the rubber band, just be going through the middle. This rubber band hangs loose to cause tension in the long string. 

3. I just realized we didn't take a picture of this last step. Let's hope I can explain it well enough!
Put the dowel rod through the second rubber band. Tie both loose ends of string to the rubber band. Do not tie these ends of string to the dowel rod or wrap the rubber band tightly around the rod. The rubber band and strings should be able to slide loosely along the rod. 

Here is a picture of the finished giant bubble blower. 

How to Use Your Giant Bubble Blower: 

1. Slide the rubber band to the end of the rod so that both loops of string hang straight down.
2. Submerge all of the string in Best Ever Bubble Solution (see recipe below). Pull it back out and let the excess drip a little.

3. Now slowly pull back on the elastic to separate the strings. See that bubble forming in the middle? Exciting stuff!
 4. Now just move the rod so air forces that giant bubble out!
 5. There it is! Wahoo!
6. While the bubble is still forming, slide the elastic back toward the other strings at the end of the rod. This will close the bubble and allow it to float away. Awesome!

If you haven't already written down this bubble recipe, or clicked HERE to print it off, I highly recommend it. It is definitely the best I've ever used. Use the glycerin or corn syrup when preparing solution for giant bubbles and give it plenty of time to sit. 


Pin It

Thursday, June 21, 2012

Bonus Post

Exciting News!
By: Deborah Pace Rowley

We have a new baby boy to learn with and to love. Declan Pace Rudd joined our family on 6/20/2012. He was 6'15" and 19 1/2 inches long. Both Momma and baby are doing well. Stay tuned for future parenting tips where Tiff teaches us all how to have a baby with 5 simple contractions! :) Pin It

Elementary Activities: Foamerators {Bubble Week!}

By Deborah Pace Rowley & Tiffany Rudd

One of the favorite activities at our Friday Fun Open House was a simple contraption called a foamerator. What a cool name, right? FOAMERATOR. It's fun to use, and fun to say. :) You probably have the supplies around the house right now, so definitely give this one a try!
Supplies You Need:

  • Water Bottle - We've found that it needs to be a slightly more expensive bottle. The super thin ones that usually come in big cases aren't sturdy enough to hold up to the rubber band. These Propel bottles worked great, so did Aquafina brand. 
  • Wash cloth or a piece of an old towel big enough to fit over the bottom of the water bottle.
  • Rubber band

Instructions for making a Foamerator:

  1. Cut the bottom off the water bottle with a good pair of scissors. It doesn't really matter how close to the bottom you cut it.
  2. Cover the hole at the bottom with your wash cloth or towel.
  3. Wrap the rubber band around the wash cloth to hold it in place. It needs to be tight enough that the towel won't fall off and air won't get through the sides. 

Now just dip the wash cloth into bubble solution (see our recipe below) and blow through the opening at the top. I wish this picture was a better one, you won't believe the huge foam snakes these make. As an added bonus, the fine bubble foam sticks around and is super fun to play with!
Click on the recipe below for a printable version.

Pin It

Wednesday, June 20, 2012

Preschool Activities: Bubble Wand Testing {Bubble Week!}

By Deborah Rowley & Tiffany Rudd

Have you ever wondered if you could blow bubbles through a comb, a pair of scissors, or an old dvd? Now you can find out! :)
This simple bubble activity is not only fun, it will get your child predicting outcomes and testing his/her hypothesis (guess). Great skills for any future scientist.
All you need to do is print the bubble wand testing page below and gather some household items. My list includes: fork, spatula, whisk, comb, slotted spoon, spaghetti spoon, apple slicer, cheese grater, scissors, spoon, hair brush, hair elastic, paper clip, old dvd, potato masher, and a cookie cutter. I've included both this one filled out with all the household items we tested and a blank one if you'd like to choose items of your own.
You'll need to help you child with predicting and filling out the record sheet. Have your child predict or guess if a certain item will work and mark yes or no. Then let him/her test it out and mark the correct answer. This is a great activity for some higher-level thinking too. Ask your child to look at the items that worked and the items that didn't work and explain to you what they think makes a good bubble blower.  
Oh, and don't forget your bubble solution. Here is the awesome recipe we use. For this activity you can skip the glycerin or corn syrup. Just water and dish soap will work fine.

Click HERE to print the bubble wand testing page!
Click HERE to print the bubble solution recipe!

Pin It

Tuesday, June 19, 2012

Toddler Activities: Rainbow Bubble Blow {Bubble Week!}

By Deborah Pace Rowley & Tiffany Rudd
If we're being honest, this activity started out being a slight fail on our part. We'd heard that you could add food coloring to a big pile of bubbles and the color would stay creating a fun rainbow effect. Not so much. :) This apparently only works with tiny bubbles which aren't created when you blow into bubble water through a straw. No worries though, the kids still loved this activity! The little ones were thrilled with the huge piles of bubbles they could create and play with and the older kids even created some games of their own. Plus, you can see a rainbow in the surface of every bubble! 

All you need for this activity is a high-sided tin or tray of some kind, bubble solution, and a straw. Just put a layer of bubble solution in the bottom of the tray and let your little one get blowing!

Tip: If you cut a tiny slit toward the bottom of the straw your child will still be able to blow through it, but it will be harder to suck anything up. This helps avoid a nasty mouthful of soap!
Note: For this activity we just mixed dawn and water, no glycerin or corn syrup needed.

Adaptations for older kids:
Bubble Race! Time the bubble blowers and see who can create the biggest pile of bubbles first.

Team Bubble Blow! These three cute girls pushed all their trays together and created a seriously huge pile of bubbles to play in. 

Click HERE to print the bubble solution recipe.

Pin It

Monday, June 18, 2012

Mealtime Activities: Magic Bubble Recipe {Bubble Week!}

By: Deborah Pace Rowley 


During our bubble activity last week we used a boatload of bubble solution! When you are using regular bubble wands, a solution of dish soap and water works great. But when you are making giant bubbles or Boo bubbles, a little stronger bubble solution is needed. Here is our foolproof big bubble recipe (Click on the recipe to print your own copy). You can find glycerin in the Pharmacy section of stores like Walmart or you can just use the corn syrup that you have at home. It really does work better the longer that it sits out. Make it ahead of time and let it sit uncovered for 24 hours or longer. 

The pictures in this post show the Boo Bubbles we made at the open house. This is normally not an activity that we would feature on our blog because it requires a more expensive container that I purchased at the Steve Spangler Science website. www.stevespanglerscience.com/product/boo-bubbles 
But Boo Bubbles are so awesome that I couldn’t resist. (FYI: I love this web site. It has great ideas for awesome science experiments. Many of them you can do with items you have at home and do not require purchasing something extra from their site.) 


Once you have purchased this special jar and tubing for around $25.00, all you need to do is add warm water, the magic bubble solution, and dry ice. Then you can make hundreds of fog-filled bubbles that you can bounce on your glove-covered hands. How cool is that! 

Adults and kids alike were completely enthralled and couldn’t get enough of playing with these fun Boo Bubbles. But even if you don’t want to get a Boo Bubble machine, you will find lots of other uses for our bubble solution on the blog this coming week. Stay tuned for my favorite post where Tiff shows you how to build your own giant bubble wand. You will be amazed how simple, easy, and cheap it is. And it kept the kids entertained for hours!
Pin It

Friday, June 15, 2012

Parenting Tips: What kids really NEED

By Tiffany Rudd
I am expecting our fourth child in less than 2 weeks. Last night I was laying in bed and remembering what it was like when I was expecting our first. 
A few months before he was born the nursery was newly painted and decorated. I had spent hours sewing the perfect bedding and curtains. Rows of new tiny clothes were freshly washed and hanging in the closet. I had a list of things I still needed to purchase before the baby arrived. I remember my sister-in-law, who was expecting her third baby at the time, saying she needed to pick up some diapers and maybe a few onesies from the store before her little girl arrived. “That’s really all you need,” she said. I was shocked! What? My list of the things my baby NEEDED was huge! 
Now, here I am, a week or so away from bringing home a new baby. Last night I chuckled to myself as I thought, “I really need to pick up some diapers and a few onesies before this baby arrives.” No long list of NEEDS, no perfectly decorated nursery, no huge new wardrobe. But no less love.
It got me thinking about what my children really NEED from me. Do they need expensive things? A big and perfectly clean house? A mom who is a size 2? Boy I hope not. :)
When I really thought about it, there were a lot of things on the “needs” list that could easily be moved to the “wants” list. Or even to the “never going to happen” list. 
What is left? What do my children really need from me? Unconditional love, understanding, quality time (not necessarily quantity), guidance. Am I spending too much time, energy, and guilt on the “wants” list? 
So, here is my tip for myself and other parents. Let’s refocus our efforts on the truly important. Let’s let go of some of those wants and make room for needs. We don’t have to be perfect and we don’t have to give our kids everything. We can relax and focus on the things they really NEED. 
Pin It

Thursday, June 14, 2012

Fun Friday Open House - Bubbles!

Dear Local Blog Readers, 

Join us for a FUN FRIDAY OPEN HOUSE on June 15th. Come to our backyard anytime between 10 and Noon that Friday morning to learn and play with your kids. 

The theme will be BUBBLES. We will be experimenting with giant bubbles, making boo bubbles filled with dry ice, creating bubble print art and more! The optional donation is $1 to $2 per child. Everyone is welcome. Bring your kids, tell all your friends and come have some Puddle Wonderful fun!!
P.S. Don't worry if you don't live close by, we'll be sharing the activities we do at the open house here on the blog next week so you can have your own bubble fun!

Pin It

Elementary Activities: The Large Plates of Rowley

By Deborah Pace Rowley

I love the post my sister wrote about her secret notebooks. If you haven’t read it, you can do so here
When my children were little we didn’t have a secret notebook to share love notes with each other, we had the Large Plates of Rowley. This was a three-ring binder filled with paper. For those not of my faith, The Large Plates of Nephi were an ancient book of scripture. They were metal plates that contained an account of the wars and contentions in Ancient America engraved by prophets and historians. An abridged account of these wars, as well as spiritual experiences and the appearance of Jesus Christ, is found in the Book of Mormon. As we read these scriptures with our children, we decided that we needed to keep a record of our wars and contentions too in the hopes that this record would help us learn how to peacefully resolve conflict in the future.

When two of my children would get into a fight, part of the consequence was getting out the Large Plates of Rowley and recording what happened, what went wrong and how they could make a better choice in the future. Most of the time we would then sit down and discuss together what they had written in the notebook. Sometimes after they had completed their writing, Dad would make his daughters kiss each other on the lips to make up. (This was a highly effective punishment!) We would also note how many times each child had written on a certain week and watch for improvement.

I love to read this notebook now that those three fighting girls are grown up and surprisingly good friends. Here are some of my favorite entries:

“I took the bear from Melissa. I should of sead pleas can I have that.”

“I said ‘I don’t like you’. I could have said something nicer.”

“I was walking back to the bathroom and I bumped into Natalie. I said “Sorry.” Then Mom told me to write. I could have done better by saying sorry louder so Mom could’ve heard.”

“I was standing up from scriptures and (since I haven’t clipped my toenails for awhile) my toenail scrapped Natalie. I could do better by not sitting right outside or inside other people’s bubbles.” 

Seriously?!! Toe nail scraping? You may want to try some Large Plates of your own. Whether or not it decreases contention among your kids, it is guaranteed to give you a few laughs!
Pin It

Wednesday, June 13, 2012

Preschool Activities: Floor Shape Songs


By Tiffany Rudd

I can’t believe I am about to post a video of me singing. I am not a singer. So, so not a singer. Like pretty much tone deaf. But this is a fun activity and has always been a favorite in my preschool classroom, so hopefully you find it worth having to listen to me sing. :) 
Also, I can’t remember what song the tune I use for this activity comes from. If you know, will you please leave a comment and let me know. It’s driving me crazy.
Anyway, here are instructions for this fun and easy shape activity. The repetition is great for kids who are just learning the names of the shapes.
1. Use masking tape or painters tape to outline the different shapes on the floor. These can be as big or small as you want depending on the amount of space you have. Just make sure they are big enough for your child to step in and out of. I didn't do and oval or a rhombus (kite shape) this time, but I usually do. Those are tricky ones for kids to remember. 
2. Sing the song below substituting in different shapes and action words each time you sing.
(Action Word) in and out of the (Shape),
Like I know that you can do!
Here are some of the many ideas you can use in the (Action Word) space: Go, walk, march, dance, hope, jump, skip, tip-toe, twirl, stomp, run, waddle, gallop, shimmy. Or, have your kids come up with some ideas on their own! 
Watch this video to hear the tune I use with this song. Isn't my little dancer the cutest thing you've ever seen? Note: I recommend turning down the volume on your computer before pushing play. Believe me, you don’t want to hear this at full blast! :)
3. Repeat, repeat, repeat! Your child will have the names of the shapes down in no time. 

Pin It

Tuesday, June 12, 2012

Toddler Activities: Glow Sticks in the Tub

By Deborah Pace Rowley
I learned about this fun sensory activity on Pinterest. It was too easy, cheap and fun for me not to share. All you need is a toddler, a bath tub and some glow sticks. I was so excited to learn that glow sticks are completely safe in water. Toddler + Tub + Darkness + Glow Sticks = Magic!

Pin It

Monday, June 11, 2012

Mealtime Activities: Backwards & Upside Down Dinner

 By Deborah Pace Rowley
To spice up a boring dinnertime routine, try this creative idea from an old issue of Family Fun Magazine. Have a crazy dinner that is backwards and upside down. You can incorporate as many or as few of these suggestions as you want.

Invite everyone to wear their clothes backwards or to come in their pajamas to dinner. Take some funny pictures to document the event. You could even try putting a shirt on your legs and a pair of pants on your arms.   
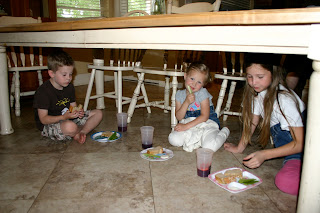
There was a lot of laughing as the kids came up with these great backwards/upside down outfits. The girls were hilarious using their skirts as shirts and jackets as pants. 

Eat underneath the table. 

Eat your foods upside down. Serve potatoes on top of the gravy. Plop meat pies onto the plate upside down. Serve hamburgers with the bottom bun on top. Put the brownie on top of the ice cream for dessert or serve pineapple upside down cake. You can even drink upside down by cutting a small hole in the bottom of the juice box or drink pouch and inserting the straw.

Or eat your foods backwards. Start with dessert, next serve the main course and vegetables. End with some fancy appetizers or crackers and cheese.

Print the menu backwards or upside down. If the menu is printed backwards, provide a mirror and teach your children how to read it. 

Speak backwards. “Pass the butter” becomes “Butter the Pass.”

At the end of the evening, play a board game backwards. “Chutes and Ladders” is perfect. It is much more fun to zoom backwards “up” the slides than it is to slide down them. 

Pin It

Friday, June 8, 2012

Parenting Tips: How to Give a Sincere Apology

By Deborah Pace Rowley                   
Recently I read the book “The Last Lecture” by Randy Pausch.  It is a book based on the final lecture Professor Pausch gave at Carnegie Mellon University in September 2007 before his death from cancer in July 2008. This book and the lecture that inspired it included advice that Randy desired to give his three young children.
One of my favorite chapters had to do with how to give a correct apology. This was a lesson that Randy gave his students every year prior to assigning group projects or reports. He knew that they would end up offending each other or letting each other down at some point in their group work and he wanted them to be able to resolve their problem quickly.

I was so impressed with his three parts of a true apology that I taught them to my children. I wish that I had known this when my children were younger. I can remember saying regularly, “Tell your sister you’re sorry.” Immediately followed by, “You call that an apology? Say “I’m sorry” like you mean it!” But did they know how to say it like they meant it? Step 1: Don’t stick out your tongue after the “I’m sorry” part. Step 2: Follow these three rules. Brilliant! I still need this lesson as an adult.

First, Randy talks about two classic bad apologies. 1. “I’m sorry you feel hurt by what I’ve done.” This is subtle but the underlying message is that the blame lies with the other person. The problem is theirs for getting hurt. 2. “I apologize for what I did but you also need to apologize to me for what you did.” That is not giving an apology but asking for one.

An effective and sincere apology has these three parts:
  • I made a mistake and I am sorry. What I did was wrong. (Accept fault with no excuses.)
  •  I feel badly I hurt you. (Show you understand that your actions hurt the other person.)
  • What can I do to make things right again? (Make up for your actions willingly.)


Even young children can learn to say that what they did was wrong. They can recognize the hurt they caused someone else and they can try to make things right again. Try teaching this to your own children and practice the three parts together. Think of what better roommates, spouses and parents your own children will be when they know how to really apologize.


Pin It

Thursday, June 7, 2012

Elementary Activities: Summer Study Packets - Kindergarten & 1st Grade

By Tiffany Rudd

Last week I promised summer study packets for kids preparing for Kindergarten and 1st grade, so here you are! Remember, you can find the packet for kids preparing for Preschool here. My two oldest and I have been sitting at the kitchen table each morning after breakfast and working on these packets together. My toddler sits nearby in her highchair coloring or stacking blocks and baby #4 (due in just 2 weeks!) is usually kicking me in the ribs. It's pretty much my favorite time of the day.

I hope you are setting aside time in your daily routine this summer for some learning time too. We keep saying it, but it really is important to set aside even just a few minutes so your child doesn't backslide educationally. 

I hope your kids enjoy these packets as much as mine are! If you are looking for a packet for an older grade leave a comment letting me know and I'll do what I can to put one together. 

Click on each picture below to download and print
*If the file doesn't automatically download click on the gray button that says Download This File

Thanks to 
for the great free worksheets! 
Pin It
Blogging tips