By Tiffany Rudd
Now that I am enjoying life with 4 children, including a 16 month old and a 1 month, my life includes a lot of diapers. Mountains of diapers...piles, scads, and oodles of diapers! And of course a lot of diaper changes. Tons, gobs, an abundance, and a plethora of diaper changes. Yep, I spend a lot of time wiping bums. One sweet tiny newborn baby bum and one cute chubby toddler bum. The toddler bum is definitely harder to keep in one place long enough wipe. The other day as I was using all my tricks to keep said bum from wiggling away, I realized again what a valuable diaper changing lesson I had learned from my mom.
In case you hadn't figured it out by now, our mom is awesome.
Anyway, early in my diaper changing days, some 2.13 million diapers ago (give or take a few :) she taught me how to use those diaper changes as everyday teachable moments. A few simple question and answer activities and not only will your toddler hold still, she'll even learn something!
So, here are my go-to Diaper Changing Activities:
1. Animal Sounds! This has always been a favorite. All you do is simply ask what different animals say. Right now at our house it sounds like this, "Anniston, what does a {dog, cat, duck, lion, monkey...} say?" At first you will also supply the sounds, but pretty soon your little one will be doing that on her own. There is nothing cuter than a little growl and 10 or so animal sounds later that bum will be clean!
2. Body Parts! For this activity you just ask where different body parts are. "Anniston, where's your {tummy, hair, mouth, nose...}?" Then of course you point to said body part and tickle. Eventually your child will be pointing on her own and laughing before you even begin to tickle. This one makes diaper changing slightly more difficult, but at least you aren't chasing a running naked bum across the room.
3. Who Loves You? This activity also evolves over time. At first I ask "Does {Mommy, Daddy, Grandma, Cameron...} love you?" And then nod and say, "Yes!" Eventually I just ask, "Who loves you?" and enjoy the responses.
These 3 basic activities have gotten me through a lot of bum wiping! And, by the time my two oldest were potty trained they knew a ton of animal sounds, could point to all their basic body parts, and hopefully felt very loved. Totally worth the smell.
Pin It
Friday, July 20, 2012
Thursday, July 19, 2012
Elementary Activities: Summer Star Gazing Guide
by: Deborah
Pace Rowley
I love staring
up at the stars on summer nights. Something about the stars makes you feel so
small and yet so close to heaven at the same time. My kids love to find the Big
Dipper and the North Star. I thought it might be fun to try to find some other
constellations and learn about the myths behind them.
I found this
great website that gives you a free print out of the night sky as it looks
where you live and the constellations that you can look for.
Here are some
pictures of a few of the constellations and the Greek myths behind
them. The pictures and text come from this web site: http://www.theoi.com/Cat_Astraioi.html
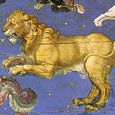
LEO,
CONSTELLATION
Latin : Leo
(the Lion)
A lion whose hide was impervious to weapons which terrorized the
countryside of Nemea. When Hercules was commanded to destroy it as one of his
twelve labors, he throttled the beast to death with his bare hands. The lion
was then placed by Hera amongst the stars as the constellation Leo.
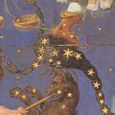
ORION,
CONSTELLATION
Latin : Orion
ORION
A giant hunter who was set amongst the stars as the constellation Orion. Some
say he chased Lepus, the hare, across the heavens with his dog, the
constellation Canis, others that he was in pursuit of Taurus the bull. In the
story of his death, Orion was either killed by Artemis or by a scorpion sent by
Gaea to punish him for boasting that he would slay all the creatures of the
earth. The scorpion was also placed amongst the stars and continued to plague
him, for as it rose in the east, Orion fled beneath the horizon in the west.
You may be able to find the three main stars of Orion’s belt.
SCORPIO, ZODIAC
CONSTELLATION
Latin : Scorpio
(the Scorpion)
SCORPION OF ORION A scorpion sent forth by the
earth-goddess Gaea to kill Orion when the giant boasted that he would slay all
the animals of the earth. The pair were placed amongst the stars as the
constellations Scorpio and Orion. The ancients sometimes combined a pair of
constellations to create the scorpion, with Libra forming the claws.
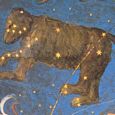
URSA MAJOR,
CONSTELLATION
Latin : Ursa
Major (the Great Bear)
Callisto was an
Arcadian princess who was loved by the god Zeus and transformed into a bear by
the wrathful goddess Hera. She was later placed amongst the stars as the
constellation Ursa Major, along with her son Arcas, who became Bootes. Hera was
still furious and forbade Callisto's stars ever to set in the river Oceanus.
Wednesday, July 18, 2012
Preschool Activities: Choo Choo Train Counting
By: Deborah
Pace Rowley
Preschoolers
love linking train cars together and pushing them down a track. Here are some
printable trains your little engineers can link together to do number
sequencing or simple addition. Simply print out the train cars at the link
below. They include numbers from 1 to 20 and several math signs including plus,
minus and equals.
Cut out the
train cars out and laminate them for added durability. Then place them in front
of your child. Preschoolers can link the numbers from 1 to 10 or 1 to 20 in
order, creating a really long train on the living room floor. You can also give
your child some pieces of cereal to “load” onto their train. Place three pieces
of cereal on the Number 3 car, four pieces of cereal on the Number 4 car etc.
Older children
can link trains by adding or subtracting numbers. You can start the train by
creating the first part of the equation such as: 2 + 5 = ____.Then you child
can finish the train by putting the caboose with the correct answer on the end.
You can also leave off the first car or the middle car in the equation for an
added challenge.
Your child can
also make as many trains as he can by linking up cars and creating equations on
his own. Time your child as he creates a train. Or try to make a really long
train by creating an interconnected equation. 1+2=3+4=7+5=13+6=20-12=8+9=17.
How long a train can you make? Have fun thinking up new ways to play.
Thanks to
Melissa at melissa.depperfamily.net for the cute train images.
Tuesday, July 17, 2012
Toddler Activities: Follow the Piggy Game with Printables
Then use the
finger puppets to play the simple game of Follow the Piggy. Have your
child choose his favorite piggy puppet and put it on his pointer finger. You
choose another puppet to put on your pointer finger.
Lead your child
through a short narrated story. Have him copy with his puppet the movements
that you make with yours.
Note: These
stories were adapted from an early story time presented by children’s librarian
Melissa Depper. You can find it here: http://melissa.depperfamily.net/blog/?p=3668.
Thanks Melissa!
Follow the
Piggy Stories:
*Your piggy is
playing Hide and Seek with his piggy friends. The piggy looks up on top of the
hill (move the puppets straight up in the air), down in a tunnel (move the
puppet straight down), across a bridge (move puppets left to right), and all
around town (move the puppets in a large circle in front of your bodies). He “finds”
his friends in a silly place, like on top of your head, or in your ear!
*Your piggy is
lost on the farm and can’t find his way home. He looks up in a tree, down in a
hole, across a log, and around a pond, before finding his way back to his own
muddy pig pen. (Make the muddy pig pen by rolling the puppet around in the palm
of your other hand.)
*Your piggy
goes to play on the playground: he climbs up the slide and slides down, swings
across the monkey bars, he goes over the climbing dome, and rides around and
around on a merry-go-round.
*Your piggy is
running away from the big, bad wolf. He crawls under the straw house because
the wolf has blown it all down, he goes around the stick house, he goes on top
of the brick house and down into the chimney. He is finally safe from the big
bad wolf!
As you tell
these stories, make sure to use the directional language words like up, down,
across, and around. Knowing directional words is an important pre-writing
skill. Your child will hear their teachers use these words when they are
learning how to move their pencils to write their letters! If they already know
what these words mean, they can concentrate on making the marks on the page.
Piggy
Printables: Here
Monday, July 16, 2012
Meal-Time Activities: Adventurous Eaters Dinner
By Tiffany Rudd
Do you have picky eaters at your house? Have a hard time getting you kids to try new foods? If so, this "Adventurous Eaters Dinner" may be able to help.
Last Saturday I mentioned a few times throughout the day how excited I was for our special dinner. "Special plates, special foods, and awesome adventurous appetites!" When dinner time came I asked the kids to help me look through the fridge and pantry for foods we'd like to try. Some of the foods we chose were favorites like chips, carrots and sugar snap peas. We also found some less common foods like raw mushrooms, green and red bell peppers and polish sausage. I made a quick cheese sauce (See recipe below), got out our funky appetizer plates, and set the table for our special dinner.
The first thing we did was discuss the rule for the evening. The one and only adventurous eaters rule was that everyone must TRY one of everything. Being an adventurous eater isn't about loving everything you try, and it definitely isn't about eating everything on your plate, it is just about being willing to try!
I chose fondue for our first adventurous eaters dinner because anything is easier to try covered in cheese. :) It was definitely a success. Both Cameron and Brooklyn gave everything a try and Cameron even tried his least favorite food twice, "Just to make sure he still didn't like it." Next time I think I'll try an assortment of dipping sauces and get even more adventurous in our food selection. I'll let you know how if goes.
Pin It
Do you have picky eaters at your house? Have a hard time getting you kids to try new foods? If so, this "Adventurous Eaters Dinner" may be able to help.
Last Saturday I mentioned a few times throughout the day how excited I was for our special dinner. "Special plates, special foods, and awesome adventurous appetites!" When dinner time came I asked the kids to help me look through the fridge and pantry for foods we'd like to try. Some of the foods we chose were favorites like chips, carrots and sugar snap peas. We also found some less common foods like raw mushrooms, green and red bell peppers and polish sausage. I made a quick cheese sauce (See recipe below), got out our funky appetizer plates, and set the table for our special dinner.
The first thing we did was discuss the rule for the evening. The one and only adventurous eaters rule was that everyone must TRY one of everything. Being an adventurous eater isn't about loving everything you try, and it definitely isn't about eating everything on your plate, it is just about being willing to try!
I chose fondue for our first adventurous eaters dinner because anything is easier to try covered in cheese. :) It was definitely a success. Both Cameron and Brooklyn gave everything a try and Cameron even tried his least favorite food twice, "Just to make sure he still didn't like it." Next time I think I'll try an assortment of dipping sauces and get even more adventurous in our food selection. I'll let you know how if goes.
Basic Cheese Sauce
1. Melt 1/4 cup butter in a medium saucepan. Add 1/4 cup flour and stir until well blended. Let bubble for just a few minutes.
2. Gradually add 2 cups milk and stir constantly until thickened.
3. Stir in 1 cup shredded cheddar cheese and heat until cheese is melted and sauce is smooth.
Friday, July 13, 2012
Parenting Tips: Family Word Collage (Writer's Workshop)
by Deborah Pace
Rowley
Pin It
On the first
day of Writer’s Workshop, I challenged the students to create a word collage
about themselves. They flipped through old magazines and sorted through stacks
of junk mail to find the perfect words to describe themselves. Kids are often
asked to create picture collages at school but word collages can be so much
more interesting and fun. Who knew that one of my students recently had her
best friend move to Singapore? Who knew she would find the word Singapore in a
magazine just waiting to be cut out? It is always interesting to see what words
or phrases students use to describe themselves- Wild Child, Funfetti, Cuddle
Up, Cleaning is a Dirty Word, Fashion Queen.
This parenting
tip involves creating a word collage, not about an individual, but about YOUR
FAMILY. Set out a piece of poster board, some scissors, some glue sticks, and a
stack of old magazines or junk mail. Cut out some big letters to spell your
last name and glue them to the top of the board.
Then let your family
add their own words to your family collage. You don’t need to find the words
intact. You can spell out the words that you would like to include by cutting
out the individual letters that you need. You can also cut out complete
sentences, phrases, or slogans. This can be an activity you complete in one
evening together or an ongoing activity that the family adds to over several
days or weeks. It can be very eye-opening to see what words family members
choose--- crazy like a fox(?!), FOOD, spiritual, service, making the grade,
BOOKS. What words do your children associate with your family? Did they use the
ones that you thought they would?
Ask your
children about the words that they chose. Be careful not to be critical or
judgmental. If kids sense any negativity, real honesty flies out the window.
(What do you mean you think our family is FRUIT CAKE?!) Keep your voice calm
and neutral as you smile and ask, “That is interesting word. How does this word
remind you of our family?” You will be amazed at what you learn. This collage
can even help you reconsider the things you focus on and what you want to
prioritize with your family in the future.
Note: The
Family Word Collage at the top of this post was created at the website: Wordle.
If you haven’t already discovered this website, you need to check it out. It
makes fun word “clouds” that you can print out and use for gifts, birthday
cards, recognition events or any occasion.
Thursday, July 12, 2012
Elementary Activities: Knights of Right Challenge with Paper Dolls (Writer's Workshop)
by: Deborah
Pace Rowley
On the third
day of the Writer’s Workshop, my oldest daughter Melissa M’Lin Rowley came to
talk to the kids about her books. She had the first book in the Knights of
Right series published when she was just 16 years old. (See the side bar for
more information on these amazing books.) During her senior year of high
school, she was able to travel around the country visiting different elementary
schools, talking about writing and making positive choices. It was fun for the
students in the Workshop to meet a real “author” and to learn that you don’t
need to be old like ME to publish books. It was especially fun because several
of the students at the workshop were serious fans of Knights of Right!
During her
elementary school presentations Melissa would hand out paper dolls of knights
and challenge the students to complete different activities to earn the armor
for their knights to wear. In the books, the main characters earn armor for
completing quests like being honest and saying ‘No’ to drugs. The elementary
school students were challenged to complete their homework and thank their
teachers. They were asked to help a friend and stand up for someone being
bullied. For each task on the list that they would complete, they would earn a
new piece of armor for their knight.
I thought it
would be fun to share the knights and their armor with you for your own summer
Knights of Right Challenge. Your kids can color the knights and hang them on
the fridge or the wall. The armor page is purposefully left blank so that you
can write your own challenge beside each piece of armor. Would you like
your child to read more this summer or to do more outdoor activities? Write
these things down next to a piece of armor. Would you like your child clean up
his room or do the dishes? These would make great armor challenges. Maybe you
would like to award a piece of armor for each time your son is kind to his
sister or each time your daughter helps her little brother. Personalize the
armor for your own family and let the Knights of Right tournament begin!
Note: These
Knights and Armor were drawn by Melissa’s illustrator: Michael Walton!
Wednesday, July 11, 2012
Preschool Activities: Homemade Books (Writer's Workshop)
By Deborah Pace
Rowley
Preschoolers
love to create homemade books. I think it makes them feel all grown-up. They
are “authors” after all! I have boxes full of the little creations my kids made
when they were small. Books filled with pictures and dictated words. Books
covered in magazine cutouts and collages. Books with numbers and objects from 1
to 10. Books with illustrations for all 26 letters of the alphabet. Books
smeared with watercolors and crayons, colored pencils and finger paints.
Homemade books are so much fun to fill!
As I prepared
for Writer’s Workshop I found this awesome website full of different homemade
book ideas: http://makingbookswithchildren.blogspot.com.
The simplest
and most versatile book that Susan Gaylord writes about is the hotdog book.
Print out the instructions below or follow this simple tutorial.
First, fold the
paper vertically- hot dog style. (I used legal size paper for a larger picture
book, but regular 81/2 x 11 sheets would also be fine.)
Then unfold it
and fold the paper horizontally or hamburger style.
Now hold the
paper with the fold away from you and fold one side up to meet the center fold.
Turn the paper
over and do the same thing again, folding the other side up to meet the center
fold.
You should have
now created a W that you can set in front of you on the table.
Take a pair of
scissors and cut the center of the W just down to the side folds.
Now pull both
halves down toward the table.
Crease the
folded paper closed so that it forms a book.
If everything
went smoothly with the above instructions, you should now have a 6-page booklet
complete with a cover and back flap for your preschooler to fill. Now that you
have made one homemade book, I guarantee that it won’t be your last!
Print out
instructions on how to make the hot dog book here:
Tuesday, July 10, 2012
Teen Activity- Speech and Thought Bubbles (Writer's Workshop)
by Deborah Pace Rowley
The first day of Writer’s Workshop we created Comic Books. As an attention-getting activity, I set out a pile of speech and thought bubbles with markers and turned the kids loose in my house. Their job was to add speech and thought bubbles to all the paintings and pictures they could find. I gave them a wad of sticky tack to stick the bubbles in place but I think some tape would work just as well.
Soon all the photographs and paintings and murals were filled with funny one-liners and the kids were so excited to drag me around the house to share what they had written. When you try this activity at your house, it doesn’t need to be done all at once. It can be an activity that evolves over time. Set out some speech and thought bubbles on the kitchen counter. Do the first speech bubble yourself, then see how your kids add to the dialogue a little bit at a time. Pictures will soon be talking back and forth to each other, making funny comments and observations about life in your home. If you have portraits of wizards or knights or fat ladies hanging around, it might even start to feel like Hogwarts!
Print out your speech and thought bubbles HERE
Monday, July 9, 2012
Mealtime Activities: Create A Web (Writer's Workshop)
by Deborah Pace Rowley
Pin It
Last week I held a Young Writer’s Workshop with
12 amazing kids. The workshop was filled with fun ideas to foster writing. I
decided to share a few of the ideas this week and will include others in later
posts. Each day we began the workshop with a different idea organizer.
Organizers are great because they help kids get thoughts from their heads on to
paper in a simple and non-threatening way. What is it about a blank piece of
lined paper that can be so scary for kids? One of my favorite organizers is a web.
This organizer can be used for everything from writing essays and planning
summer vacations to composing shopping lists!
Kids who are comfortable putting ideas on paper
have a tremendous advantage in their school work. Using organizers in a fun way
at home can really improve this skill. Simply print out the web from the link
below and set it on the dinner table with some markers after an adventurous
summer day. For example: I could set out the web after the kids and I spent the
day at the local water park. Announce to Dad during dinner that the family is
going to tell him all about their day using a spider web of words. Begin by
filling in one of the bubbles with a topic related to the day, then pass it on
to another family member. They can add a detail to that topic or start a topic
of their own. Continue until all of the bubbles are filled. You can even add
some more bubbles of your own. One of our topics about the water park could be:
“Scary Slides.” Some of the details included in the bubbles that branch off “Scary
Slides” might be:
Mom closed her eyes on the Boomerang.
Katie and Addie rode the Free Fall.
Joseph learned the trick to catch as much air
as possible off the biggest slides.
Other topics we could include in the big
bubbles: Getting There, Injuries, and Safe Old Lady Slides. Trust me, there are
some stories behind those topics! It is amazing how many things you can
remember to tell Dad once you are prompted by the organizer. Try it and see how
much fun spinning your own “spider web” can be!
Note: I found the idea web organizer on the
Scholastic website. They have lots of other great organizers at this site as
well. Check it out.
Subscribe to:
Posts (Atom)